📥 Installation
This guide provides instructions for installing and running Alaz, an eBPF agent for Anteon.
Installing Alaz on Anteon Self-Hosted requires some additional steps. See exposing the application URL.
- Click the Set Up Cluster button:
.webp)
- A pop-up will open and show you how to install Alaz via Kubectl or Helm:
.webp)
Kubectl

This installs Alaz as a DaemonSet in your cluster. Let's see what each line does:
# Deploy Alaz with Kubectl
1. MONITORING_ID=0ce2ef05-ef64-459d-90d9-7f2cbd65fff8
2. curl -sSL https://raw.githubusercontent.com/ddosify/alaz/master/resources/alaz.yaml -o alaz.yaml
3. sed -i"" -e "s/<MONITORING_ID>/$MONITORING_ID/g" alaz.yaml
4. kubectl create namespace anteon
5. kubectl apply -f alaz.yaml
- Defines the monitoring id of the cluster. It's a unique id for the cluster and is auto-generated by Anteon.
- Retrieves the Alaz yaml file containing the required declarations. Check file.
- Replaces the $MONITORING_ID variable with the monitoring id declared in Step 1.
- Creates the
anteonnamespace. - Applies the Alaz yaml file.
Exposing the Application URL
If you are self-hosting Anteon, you need to expose your Self-Hosted application URL so that Alaz could write data to it. For this, you can use tools such as ngrok or Cloudflare Tunnels. In this guide, we will be using ngrok.
-
Follow the first 2 steps in this post to configure ngrok: https://ngrok.com/docs/getting-started/.
-
Then run:
ngrok http http://localhost:8014
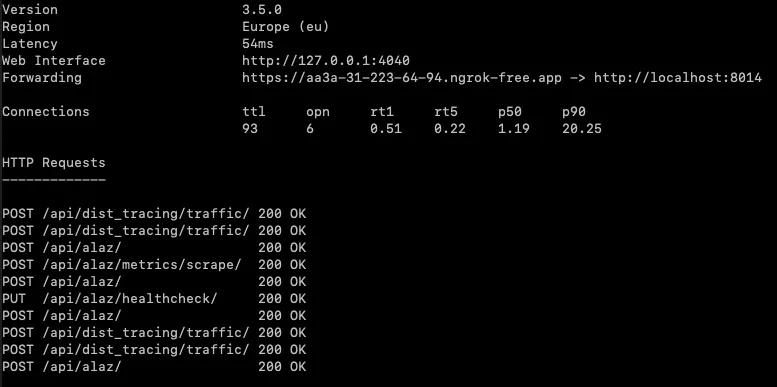
- This will take your terminal into a session. In this session, copy the URL in the "Forwarding" row. In the example image below, the URL
https://aa3a-31-223-64-94.ngrok-free.apppoints traffic to the URLhttp://localhost:8014. Copy the first URL.
-
During the Kubectl steps, change the protocol and the URL according to your exposed URL. In our example, we set
httptohttpsand set our URL asaa3a-31-223-64-94.ngrok-free.app. -
The pop-ups now will look like this:
.webp)
.webp)
- Now you can execute these commands to install Alaz.
Helm
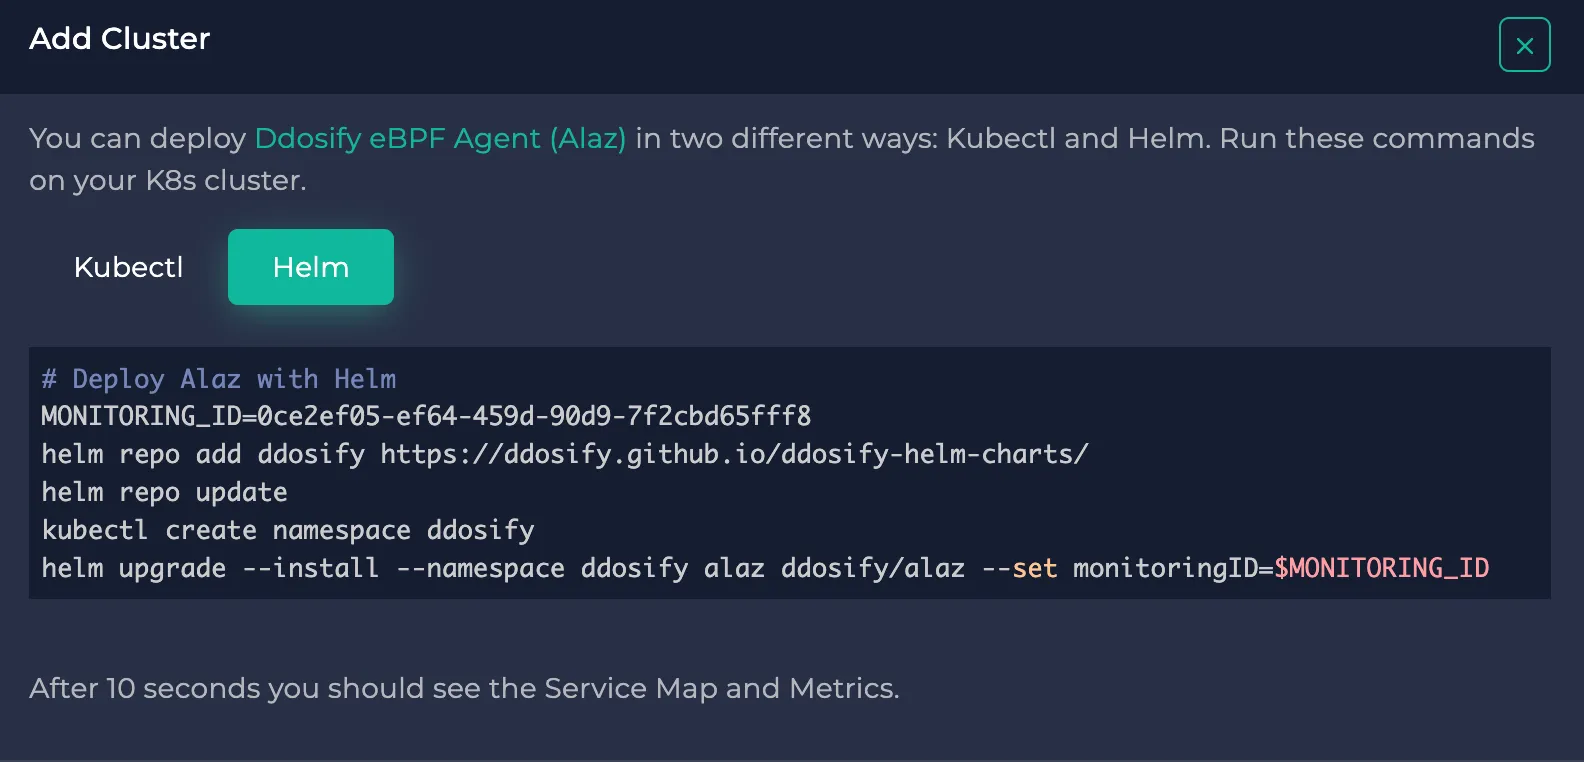
This uses the Helm package manager to do the same. It installs Alaz as a DaemonSet in your cluster. Let's see what each line does:
# Deploy Alaz with Helm
1. MONITORING_ID=0ce2ef05-ef64-459d-90d9-7f2cbd65fff8
2. helm repo add anteon https://anteon.github.io/anteon-helm-charts/
3. helm repo update
4. kubectl create namespace anteon
5. helm upgrade --install --namespace anteon alaz anteon/alaz --set monitoringID=$MONITORING_ID
-
Defines the monitoring id of the cluster. It's a unique id for the cluster and is auto-generated by Anteon.
-
Adds the Anteon Helm chart to your local Helm registry. Check the Helm Chart.
-
Updates your Helm registry with the addition of Anteon.
-
Creates the
anteonnamespace. -
Installs Alaz in your cluster using Helm by setting the monitoring id. You can also set other parameters like backendHost if you use Self-hosted. Check Helm Chart parameters.
-
After a few seconds, Service Map and Metrics Dashboard will be ready on Anteon.
.webp)